Back Up Your Gmail Account
 A lot of information sent over email these days can be very important, such as account and password information, bank statements, university grades, business reports, and general correspondence among friends and family. It’s always possible, though, that any data you store on the Internet could get wiped out. On February 28, 2011, Google confirmed that many Gmail users had temporarily lost access to their emails.If you’re worried about ever losing your emails to a similar glitch, it’s probably a good idea to regularly backup your Gmail account. By configuring an email client on your computer, you can download your emails onto your hard drive by following these steps.
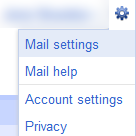
Method 1 of 6: Mail Settings in Gmail
- Log into Gmail and click on “Mail Settings” in the top right hand corner. This can be accessed from any Gmail page.
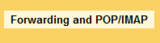
- Locate and click on the “Forwarding and POP/IMAP” tab.
- Look under “POP Download”. Select the first option, “Enable POP for all mail (even mail that’s already been downloaded)”.

- Click on “Save Changes” at the bottom.
- Configure your mail client following the steps below. Once your mail client is configured to download your email, remember to open it periodically to backup.
Method 2 of 6: Download Gmail Backup
- Go to: https://code.google.com/p/gmail-backup-com/ and select “download” to install the software.
- Open your command or terminal and go to directory of the program.
- Run the program and replace “dir” with the directory name you want to use and your email address with your own password.
Method 3 of 6: Apple Mail
- Click Mail > Preferences.
- Click the Accounts tab.
- Click the plus sign (+) at the bottom to add a new account.
- Enter your name in the Full Name field.
- Enter your Gmail address in the Email Address field. Use username@gmail.com, or username@your_domain.com for Google Apps users.
- Enter your Gmail password in the Password field.
- Check the box next to “Automatically set up your account”. This only applies to Apple Mail 3.0. Skip this step if using 4.0.
- Click Create.
Method 4 of 6: Outlook Express
- Click Tools > Accounts.
- Click Add.
- Click Mail.
- Enter your name in the Display name field and click Next.
- Enter your full Gmail email address in the Email address field, and click Next. If you use Google apps, enter ‘username@your_domain.com‘ instead.
- Type pop.gmail.com in the Incoming mail (POP3, IMAP or HTTP) server field.
- Type smtp.gmail.com in the Outgoing mail (SMTP) server field. Google Apps users must enter the server name, not your domain name.
- Click Next.
- Enter your full email address in the Account name field. Enter your email password in the Password field, and click Next.
- Click Finish.
- Highlight pop.gmail.com under Account. Click Properties.
- Click the Advanced tab.
- Fill in the following information:
- Check the box next to “This server requires a secure connection (SSL)” under Outgoing Mail (SMTP).
- Enter 465 in the Outgoing mail (SMTP): field.
- Under Outgoing Mail (SMTP), check the box next to “This server requires a secure connection (SSL)”.
- Under Incoming mail (POP3), check the box next to “This server requires a secure connection (SSL).” The port will change to 995.
- Return to the Servers tab. Check the box next to “My server requires authentication.”
- Return to the Servers tab. Check the box next to “My server requires authentication.”
- Click OK.
Method 5 of 6: Thunderbird
- Open Thunderbird.
- Enter your Gmail username and Google password. Your username is whatever you put before @gmail.com.
- Thunderbird will download your e-mail. Note that Thunderbird doesn’t backup your sent mail.
Method 6 of 6: Windows Mail
- Click Tools menu > Accounts.
- Click Add.
- Select Email Account and click Next.
- Enter your name in the From field of outgoing messages. Click Next.
- Enter your full Gmail address. For Google Apps users, enter username@your_domain.com.
- Fill in all necessary fields with the following information:
- Incoming mail server type: POP3
- Incoming mail (POP3 or IMAP) server: pop.gmail.com. Google Apps users, enter the server name provided, not your domain name.
- Outgoing e-mail server (SMTP) name: smtp.gmail.com
- Outgoing server requires authentication: enabled
- Click Next, and enter your full Gmail address and your Gmail password. Google Apps users, enter username@your_domain.com.
- Click Next. Check the box next to “Do not download my e-mail at this time.” Click Finish.
- On the Internet Accounts screen, make sure that your pop.gmail.com mail account is selected. Click the Properties button.
- On the Advanced tab, enter 465 in the in the box next to Outgoing mail (SMTP). Check the box next to “This server requires an encrypted connection (SSL).”
- Check the box next to “This server requires an encrypted connection (SSL)” under Incoming mail (POP3). The box next to Incoming mail (POP3) should automatically update to 995.
- Click OK. Close the Internet Accounts window.
Tips
- You can use a cloud based solution like Dropmyemail to backup your Gmail account and then use the one click migrate function to migrate your email to a new Gmail account when needed. This way you will have a regular backup of your GMail and be able to migrate it to any service you want including GMail.
- Only email that appear in “All Mail” or your inbox will be included. All “Spam” and “Trash” are not downloaded.
- It may take time for everything to appear because the mail is downloaded in batches instead of individual emails.


You May Also Like
How To Protect Your USB with Password

Tally Erp9 Educational version